


Complete ANTCUBE Setup Guide for Beginner Ant Keepers
Understanding ANTCUBE Formicarium Systems
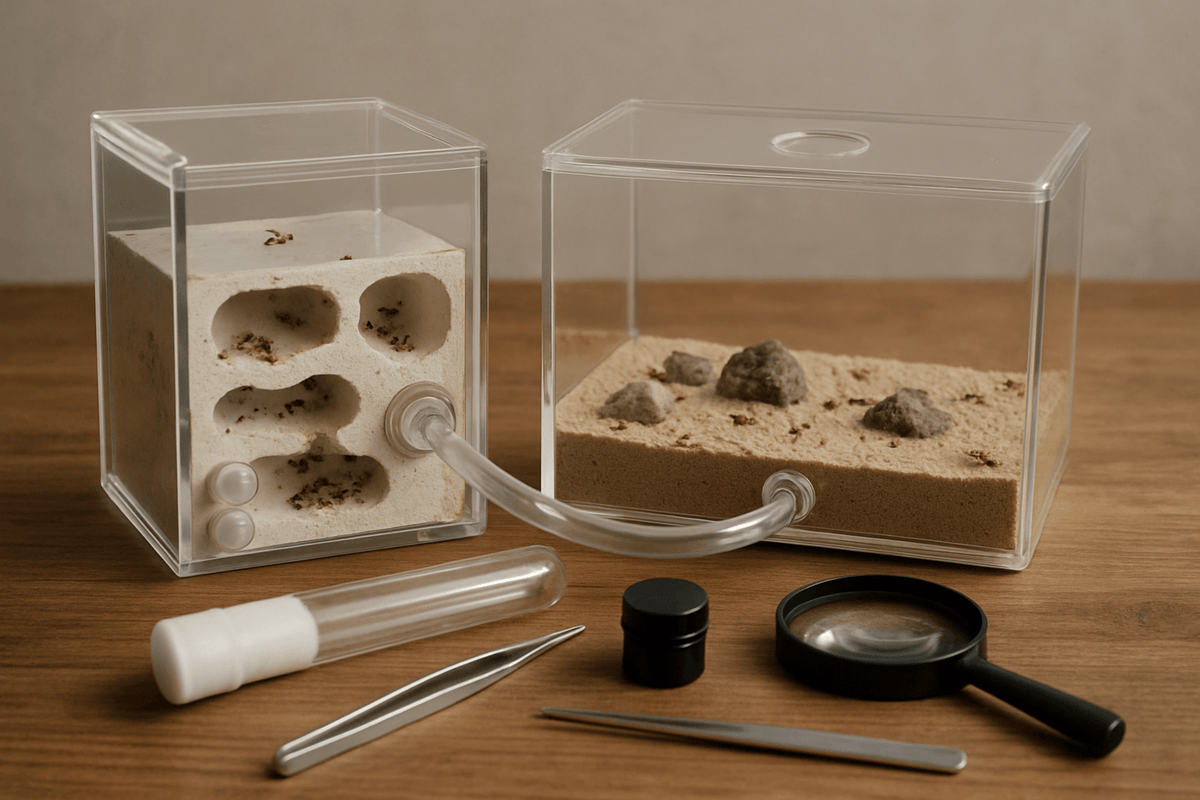
ANTCUBE represents a revolutionary approach to myrmecological husbandry, offering transparent acrylic habitats that provide optimal visibility for observing colony dynamics. These sophisticated formicarium systems utilize modular designs that accommodate various ant species while maintaining proper moisture gradients and ventilation. The transparent construction allows enthusiasts to witness fascinating behaviors like brood tending, foraging patterns, and intricate tunnel excavation.
The modular nature of ANTCUBE systems enables seamless expansion as colonies mature and require additional nesting chambers. Each module connects through precisely engineered ports that maintain structural integrity while facilitating ant movement. This design philosophy ensures longevity and adaptability, crucial factors for successful long-term ant keeping.
Essential Components for Your Ant Farm Setup
Primary Habitat Modules
Your ANTCUBE setup requires several fundamental components to create a thriving ecosystem. The nesting module serves as the primary residence where your colony establishes brood chambers and food storage areas. These chambers feature adjustable humidity systems through water reservoirs that maintain optimal moisture levels without creating oversaturation.
Foraging areas complement the nesting chambers by providing hunting grounds and exploration zones. These spaces should remain relatively dry compared to nesting areas, mimicking natural habitat conditions where ants venture from moist underground colonies to forage in drier surface environments.
Specialized ANTCUBE Starter Solutions
For beginners seeking comprehensive setup solutions, the ANTCUBE Starter Set L 2020 Combi provides an expertly curated collection of essential components. This complete system eliminates guesswork by including properly sized nesting chambers, foraging areas, and all necessary connection hardware. The starter set addresses common beginner challenges like improper humidity management and inadequate space planning through its thoughtfully designed configuration.
The combi set's modular approach allows immediate setup while providing expansion capabilities as your colony grows. This scalability prevents the need for complete habitat replacement as your myrmecological journey progresses.
Ventilation and Climate Control Systems
Proper airflow management prevents harmful condensation while maintaining necessary humidity levels. ANTCUBE systems incorporate micro-ventilation ports that allow gas exchange without enabling escape routes. These precisely calibrated openings maintain atmospheric balance while preventing the accumulation of carbon dioxide and other metabolic byproducts.
Temperature regulation becomes critical for species-specific requirements. Most temperate ant species thrive in temperatures ranging from 68-78°F, while tropical species may require slightly elevated conditions.
Step-by-Step Assembly Process
Initial Module Configuration
Begin assembly by carefully examining all components for manufacturing defects or damage. Clean each module with distilled water to remove any residual particles from the manufacturing process. Avoid harsh chemicals that might leave toxic residues harmful to your future colony inhabitants.
Connect the nesting chamber to the foraging area using the provided tubing system. Ensure all connections achieve secure seals to prevent escapes while maintaining proper ventilation. The connection points should align perfectly without forcing components together, as excessive pressure can create stress fractures in the acrylic.
Moisture System Installation
Fill the water reservoirs with distilled water to establish initial humidity levels. The water should reach designated fill lines without overflowing into ant-accessible areas. Monitor these reservoirs regularly, as evaporation rates vary based on ambient conditions and seasonal changes.
Test the moisture distribution by observing condensation patterns within the first 24-48 hours after setup. Proper humidity should create slight fogging on chamber walls without excessive water droplet accumulation.
Substrate Selection and Preparation
Substrate choice significantly impacts colony success and habitat sustainability. Sand-clay mixtures provide excellent excavation opportunities for species that enjoy tunneling, while some species prefer minimal substrate with provided chamber structures. Research your specific species' natural habitat preferences to make informed substrate decisions.
Organic substrates like coconut fiber or peat moss offer natural aesthetics but require careful monitoring for mold development. Inorganic options such as specialized aquarium sand provide cleaner alternatives with reduced contamination risks.
"The substrate serves as both foundation and canvas for your colony's architectural endeavors, making selection a crucial decision that impacts long-term habitat success."
Colony Introduction and Acclimation
Pre-Introduction Preparations
Allow your completed setup to stabilize for 48-72 hours before introducing inhabitants. This equilibration period ensures proper humidity distribution and allows any residual odors to dissipate. Document baseline conditions including temperature, humidity, and overall system functionality.
Prepare temporary housing for your colony during the transition period. Small test tubes with cotton plugs provide secure temporary accommodation while you monitor the main habitat for any issues.
Gradual Colony Transfer
Colony introduction requires patience and careful observation. Place the temporary housing near the habitat entrance, allowing workers to explore the new environment voluntarily. Forced transfers can stress colonies and disrupt established social structures.
Monitor worker behavior during initial exploration phases. Healthy colonies typically begin scouting activities within hours, with workers returning to communicate findings through chemical signals.
Ongoing Maintenance and Monitoring
| Maintenance Task | Frequency | Key Indicators |
|---|---|---|
| Water Reservoir Refilling | Weekly | Visible water levels, humidity meters |
| Feeding Schedule | 2-3 times weekly | Food consumption rates, worker activity |
| Waste Removal | As needed | Visible debris accumulation, odor development |
| System Cleaning | Monthly | Algae growth, mineral deposits |
Regular maintenance ensures optimal colony health and habitat longevity. Establish consistent schedules for water replenishment, feeding, and general upkeep. Document observations to identify patterns and potential issues before they become critical problems.
Troubleshooting Common Setup Issues
Condensation problems often indicate improper ventilation or excessive humidity levels. Adjust water reservoir volumes or increase ventilation to restore balance. Conversely, insufficient humidity manifests through minimal condensation and possible worker dehydration behaviors.
Escape attempts typically signal inadequate habitat conditions or improper sealing. Examine all connection points and ensure environmental parameters meet species-specific requirements. Address underlying causes rather than simply reinforcing containment measures.
Frequently Asked Questions
- How long before I see tunnel construction activity? Most colonies begin excavation within 1-2 weeks, depending on species and environmental satisfaction levels.
- What indicates successful habitat acceptance? Workers actively exploring, brood relocation, and resumed normal feeding patterns demonstrate successful acclimation.
- Can I modify the setup after colony introduction? Minor adjustments remain possible, but major modifications should wait for natural migration periods or temporary colony housing.
Successful ANTCUBE setup requires attention to detail, patience during establishment phases, and commitment to ongoing maintenance. These sophisticated systems reward careful preparation with years of fascinating observations and educational opportunities.

De Talis Us



Dejar un comentario
Este sitio está protegido por hCaptcha y se aplican la Política de privacidad de hCaptcha y los Términos del servicio.